
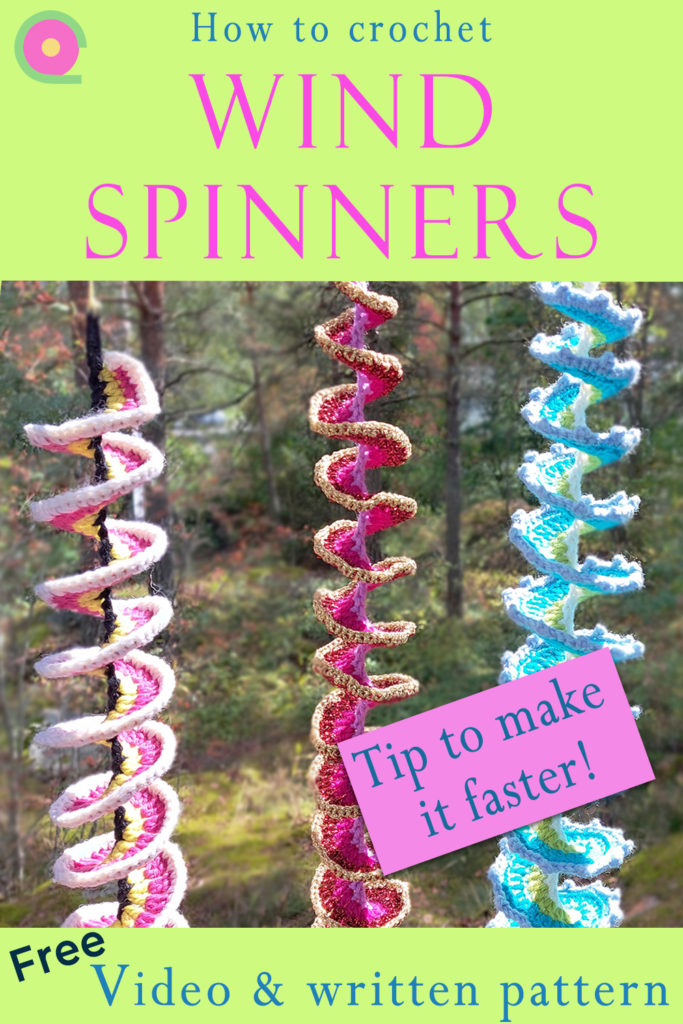
Crochet this easy wind spinner! How would a colorful wind spinner look on your veranda, balcony or in your garden? Wind spinners are simple to make and suitable for a beginner crochet project. It doesn’t require a lot of yarn so it is a great way to use up some of your left-over yarn. See also decoration and customization ideas here!
This pattern uses a tip that saves you both time and yarn!
See also how to make wind spinners using twine or cord.
You can make the wind spinner as long as you want to. A group of different spinners makes a lovely display. You can also decorate your wind spinner:
- Tassel
- Beads
- Pompon
- Crystals
- Bells (Make sure they don’t annoy your neighbours!)
- String of battery operated LED lights
- Ribbons
Tip
Even though crocheting a wind spinner is easy, there is a lot of repetition. The longer your spinner is, the more stitches there are on the last increase row. For this reason, I make the third row slightly differently from most patterns of spirals or curlycues. Instead of having three stitches in every stitch I only make two plus chain one. This makes it lighter, faster and takes less yarn, yet gives the same size of a spiral.
This post may contain affiliate links. It means that if you purchase a product I recommend, I may earn a small commission with no added cost to you.
How to crochet a wind spinner – written pattern
The pattern explains how to make a wind spinner of any length. The wind spinner is tapered at both ends.
The link to the step by step video tutorial is under the written pattern!
Abbreviations
Using US crochet terms
Ch – Chain
Yo – Yarn over
St, Sts – stitch, stitches
Fsc – Foundation single crochet (Slip knot, ch2, insert hook into first chain stitch, yo, pull up loop, yo, pull yarn through first loop on hook, yo, pull yarn though both loops on hook) Shown on the video or on a separate video.
Sc – single crochet
Hdc – half double crochet
Dc – double crochet
What you need:
Up to 4 colors of yarn. The yarns should be similar weight.
A crochet hook to go with your yarn. Check out my favourite crochet hooks!
Stitch marker (or piece of yarn to use as a stitch marker)
Thread or fine cord for hanging the spinner
Start, Row 1:
Fsc the length you want your spinner to be. Cut off yarn. Add stitch marker to the start of the piece.
Row 2:
Start at stitch marker. Join new color yarn. 2 sc in 1st st, (2 sc in next st), repeat 8 more times. (2 hdc in next st), repeat 9 more times. Repeat (2 dc in next st) until you have 20 sts left in foundation chain. (2 hdc in next st), repeat 9 more times. (2 sc in next st), repeat 9 more times. Cut off yarn.
Row 3
Start at stitch marker. Skip 1st st. Join new color yarn. (2 sc in next st, ch1), repeat 6 more times. (2 hdc in next st, ch1), repeat 6 more times. Repeat (2 dc in next st, ch1) until you have 14 sts left in foundation chain. (2 hdc in next st, ch1), repeat 6 more times. (2 sc in next st, ch1), repeat 6 more times. Cut off yarn.
Row 4, edging
Start at stitch marker. Join new color yarn. Sc in back loop of every st of previous row (including chain stitches). Fasten off, weave in yarn ends.
Shape the spiral. Add a piece of thread or cord for hanging to the end that has the stitch marker. Remove stitch marker. Hang the wind spinner.
Video: How to crochet a wind spinner
You can also watch a video about crocheting mini wind spinners for Christmas tree decorations!

Pin the crocheted wind spinner:
Pinterest continues to be the main source of readers finding my blog posts.
What did u use to hang these?
I used grizzly sewing thread. You need something that lets them spin freely so it’s good to be thin thread or cord. But it needs to be very strong so it doesn’t break when it twirls. And also attached tightly in both ends.
Thank you, for the helpful tip
Is grizzly sewing thread the same as upholstery thread?
I don’t know what upholstery thread is exactly but it sounds like the same. Sewing thread, only very slightly thicker but much more durable, can’t possibly break it by hand.
Hi Tuula,
Thank you for this pattern and the instruction. I learned at least two new things while watching your wonderful video.
My husband suggested using Ball Bearing Barrel Swivels (fishermen use them) to keep the thread from twisting and breaking. Great idea on his part. 🙂 I am sure these are available everywhere because fishermen are also everywhere. 🙂 They are small and very inexpensive.
Thank you, that’s an interesting idea! I’ll have to try that, sounds like something that would be useful!🙂
i dont understand that fsc, i started it as to your instructions, however, where does the next one goes?
It stands for Foundation Single Crochet. See YouTube for how to.
Watch YouTube Instructions, that’s how I learned
A large fishing swivel works great and easy to attach and hang with the hook!
That is a great tip, thank you!
Thankyou Tuula for the windspinner pattern. You are such a good teacher. Thankyou!
Great to hear, thank you!
i dont understand that fsc, i started it as to your instructions, however, where does the next one goes?
You can slow the video down if it seems to go too fast to see, at this spot, https://youtu.be/MkIdBnMlP3Q?t=99 . Or I also have a separate video showing how to do the fsc, https://youtu.be/85wpXoltowA
Or, like I say on the video, you can replace the fsc by making a chain and sc into every chain.
If making reg ch instead of fsc do we sc back up the ch before cutting yarn off or do we cut yarn and attach and sc back down ch
If I understood the question correctly – I would use the same yarn without cutting it off.
Love your video witch. I did share with my sister thank you for your patience in teaching
Thank you, that’s great!
I’m having a hard time understanding row 2. You say repeat the say 2 dc until I have 20 sts left then you give the instructions that are the same as the beginning of the row. What am I missing??
The spinner is tapered at both ends. You start and finish with sc, then hdc and all of the middle is dc. The instructions give the hdc and sc in opposite order.
If it seems unclear you can check on the video. Hope this helps.
Yeah. They are cool but I don’t understand not having a stitch county. How do you repeat 6 times then 8 times and have 20 left? I gave up!
People can make it any length. The pattern explains the start and end where you taper. So after you have done the entire length of your wind spinner (it can be 100 stitches, 300 stitches, anything, you stop where you have 20 stitches left and do the rest. Did you watch the video carefully, it shows this?
Just love the spinners, your directions are the greatest. where do you put thre cording for hanging do you pull it through the whole spinner?
Glad you like them! I didn’t put the cord through, just attacthed at the top. It is important to use the type of cord that lets it twirl freely so it needs to be strong and very thin. I find that grizzly sewing thread is best. It needs to be strong enough that you can’t break it in your hands so it won’t break when it’s windy. But it can’t be as thick as store twine because that doesn’t allow it to turn freely.
Just a suggestion, you can use these https://www.basspro.com/shop/en/new-product-25518?ds_e=MICROSOFT&ds_c=Shop%7CGeneric%7CAllProducts%7CHigh%7CSSCCatchAll&msclkid=f040d03daf631e35771cb1429db10c4e&gclid=f040d03daf631e35771cb1429db10c4e&gclsrc=3p.ds
It called a leader in fishing, they come in different types. But what it does is let’s things spin without getting all tangled up.
My question is how well do they hold up in the weather ? Oh one could use plastic bags!
That would hold up to the rain and such!
So love the spinners I just made two snow flake one and a sun flower one, I use my husbands fishing gear for my spinner works great , that way you can use any yarn.
That sounds like a great idea!
Could you please let me know how many stitches you do in your original FSC? Thank you
I’m not sure I understand the question. The amount depends on how long you want the wind spinner to be so I have never counted the stitches, just looked that the length of it was approximately what I wanted for the finished spinner to be.
Thankyou for sharing this great pattern 🌸👌.
Great that you enjoyed it, thank you!
My spinner is not curling. You indicate that you must shape it, but do I wet it to shape it? Can you give me a hint as to why it isn’t curling as shown, Thanks
No need to wet it. Without seeing it it is hard to say why it doesn’t curl if all the stitch amounts have been the same. But you could watch again the bit on the video that shows the shaping, and if necessary, slow the video down https://youtu.be/MkIdBnMlP3Q?si=_tQcqiumQnuYUgwg&t=801 . This link goes to the right spot on the video but there may be an ad first. Hope this helps!
I love these, I’m going to make loads of them for my garden. I’m also going to do some in Christmas colours as window decorations. Thank you. Lin Brown from England.